Thursday, February 20, 2014

Carrera GO!!! Power Grip 1/43 Race Set

By Michael Ashton

1/43rd scale static model cars have been around since the 1950's. However, 1/43rd scale slot car racing is a relatively new development. And its popularity among both the general toy-buying public and slot racing hobby enthusiasts is growing steadily. The reasons for this most likely lie in the inherent advantages and recent advancements of 1/43rd scale slot racing systems:
  • First and foremost, is size: a 1/43rd scale track layout will require 25-30% less area than a comparable 1/32nd scale layout. So 1/43rd scale tracks don't have to be tiny and cramped. A challenging, realistic 1/43rd layout can fit nicely on a 4' x 8' table.
  • Cost: 1/43rd scale cars and track generally cost less than half of their larger scale counterparts.
  • Realism: 1/43rd scale car appearance is steadily improving. Although they usually lack an interior, scale accuracy and detail is surprisingly good.
  • Accessories: track sections such as a jumps, loops and crossing intersections are available to make the slot racing experience more appealing to the younger enthusiast.
Of course there are also disadvantages of 1/43rd compared to the larger scales such as lesser overall realism, a narrower selection of available cars and slightly less life-like performance. However, these tend to be significant only to the more serious hobbyist. In any case, rather than a comparison to the other branches of the hobby, this review will concentrate on evaluating a 1/43rd scale racing set on its own merit, looking at quality, value and suitability for the intended (or anticipated) customer base.

The set that we will be looking at is the Carrera GO!!! Power Grip race set. I believe this to be among the most basic, entry level racing sets offering realistic race cars (Sponge Bob, Mario and Disney notwithstanding) available from Carrera. It is clearly intended for casual family racing with youngsters in the home environment. This will be a good test of Carrera's (or any manufacturer's) ability to deliver an uncomplicated slot racing platform that can hold the interest of a customer base that is often overwhelmed by the myriad of choices competing for their entertainment dollar.
So, it's Christmas or maybe birthday morning and Mom or Dad has just finished assembling the three-wheeler and the doll house. And the last of the video games has been installed. Now it's time to open the Carrera GO!!! Power Grip box and see what may be lurking inside…
My first impression is that the packaging is well designed and logically arranged. It obviously provides a secure environment for the contents. This is important, especially for the first-time user, who should be reassured at every step of the initial encounter that what lies ahead will be fun and relaxing — not stressful!

The race set contains everything that is needed to create a complete albeit very small slot racing environment:
  • Two impressive looking GT cars.
  • Two thumb-trigger controllers.
  • A simple mechanical lap counter.
  • A 14.8 volt 750 ma AC/DC transformer (plenty for the two cars).
  • Functional guard rails for all curve track sections — a nice touch.
  • Spare braids and guide pins.
  • Enough track to create the very small modified figure eight layout pictured in the user instruction sheet shown below:
A note on the instructions: they are the graphic type, intended to be universal, with sparse textual description. However, every important aspect of assembly and operation is covered, although a few key points are relatively subtle and will be highlighted later in this review. Regardless, I would be surprised by anyone over the age of eight years being unable to get this set assembled and working with reasonable effort.

The layout as depicted on the instruction sheet will fit in a 4' 8" x 2' 4" inch area. So I decided to set up on the dining room table. This is the first time I have experienced both Carrera and the 1/43rd scale track. Carrera track is known to be rigid and tight fitting, so it is prudent to be methodical and exercise care when connecting the track sections, especially for the first time. Needless to say, this should be the case for all aspects of track assembly and set up. 

The Track

The first thing to be aware of when connecting the Carrera GO!!! track sections is that the connecting tabs create a very secure and tight union. This can make disconnecting the track sections somewhat difficult and unnerving when it is time to put the race set away.
A small amount of plastic-safe grease on the sides of each tab is quite effective in minimizing this problem initially. Then after a few cycles of assembly/disassembly the track sections become easier to work with.
This type of race set will very likely be assembled and disassembled frequently. It is, therefore, essential that both activities can be handled quickly but without any damage to the connecting tabs. Note that the best way to avoid damage when disconnecting track sections is to pull two sections apart in a parallel fashion. In other words, do not twist or wiggle the two sections. Don't be afraid to pull hard — just pull them apart in a straight line. This is illustrated in the instruction sheet as shown below.
As previously mentioned, the Carrera track is very rigid. This, coupled with the tight fitting tabs can make assembly of the final track sections quite difficult because the track does not bend or flex enough to fit the track section into the final space. This can be avoided by creating subassemblies that can then be connected without the need to spread that final opening. For example, the following photo shows how the 90° curves are connected to the rest of the track as a subassembly.
The lap counter is the very simple mechanical type. The counter pointer increments each time the car's guide pin strikes a small lever located at the base of the slot. Turning the counter dial clockwise (only) to the number 50 resets the counter to 0. It should be noted that not all brands of 1/43rd scale cars will work with this lap counter. While running an SCX Compact car, which uses the keel or flag type of guide similar to 1/32nd scale cars, the counter did not increment reliably.
All track sections, including the power base and lap counter, go together the same way. Once all track connections are completed, it is time to connect the power source and controllers. First insert the DC plug from the AC/DC transformer into the center slot of the power base track as shown below. Then plug the transformer's AC power cord directly into a three-pronged grounded 110 volt AC wall outlet.
Now insert the plug from one of the controllers into the left hand controller slot in the power base as shown below. Note that the controller plugs will only fit the outside slots and that the DC power plug will only fit the center slot so that an incorrect connection cannot be made. All three plugs will only fit their respective slot in one direction, so correct polarity is assured.
The power base is shown below with all connections complete.
Finally, the guard rails must be connected. The post has a tab that is inserted under the outside lip of the curve track section and then the post is pushed up and inward until it clips to the lip.
Position the posts initially as shown in the top photo below. Then slide the posts in the directions shown by the red arrows until they contact a stop on the inside of the track lip and will not move any further as shown in the bottom photo. The posts are then in the proper location. There are four posts for each curved section.
Lastly, slide the guard rail strips through the retaining slots on the inside (track side) of the guard rail posts. There is one strip for each curved section.
As can be seen in the above photo, the guard rail strips extend about 9 mm beyond the edge of the track. I feel that this is a nice touch because the guard rails provide less of an advantage to the outside lane on the curves. This requires that the cars be driven through the turns using the throttle (i.e., less than full throttle — even with increased down force of the traction magnet).

Once all track, power and controller connections are made you will have a finished layout that should look like the following photo.

We're getting close now! But resist the urge to throw a car on the track and start running. There are just a few more details that will make the initial racing experience so much better.

The Controllers

The controllers included in the GO!!! Power Grip set are the thumb trigger or plunger type. This type of controller is used by Carrera almost exclusively.
The cars accelerate when the thumb trigger is depressed and slow down when the trigger is released. The controllers provided seem to have an acceptable throttle range and are well matched to the motors of the included cars. The thumb trigger provides between 0% and about 70% of the available power to the cars. The red Turbo button, highlighted above by the yellow arrow, provides 100% of available power immediately when depressed. This implementation of controller will be discussed in more detail later in the review.

The controllers come fitted with a spacer, shown by the red arrow in the following photo, which limits the downward travel of the thumb trigger. This works effectively as a governor and is a nice feature for very young and/or inexperienced drivers, allowing the cars to stay in the slot while experience and confidence are acquired over time. The spacers are easily removed and reinstalled.

The Cars

The Carrera GO!!! Power Grip set comes with two GT cars. A Dodge Viper SRT GTS-R and a Ferrari 458 Italia GT2 AF Corse. Both cars represent actual racing cars and appear to be remarkably faithful to the originals in both detail and design. Examining the cars closely reinforces just how far the 1/43rd scale has advanced in this area.

To my surprise, apart from the glass areas and rear windshield deck, there is no paint on the Ferrari. The red body color is molded in the plastic and all graphics are decals or stickers. There does not appear to be a clear coat. The appearance is still quite good. The Viper body primary and secondary colors are painted and all graphics are Tampo printed. Fit and finish of both cars, given the small scale and the fact that they are included in a set, is superior.
Mechanical simplicity is evident in the following views of the chassis. The traction magnet, which helps keep the car in the slot on the turns, can be seen located under the motor just in front of the crown gear. Anyone with even rudimentary slot racing experience will be in familiar territory. This is reassuring, however, probably not a significant factor for the moms, dads and youngsters who will be racing these cars. It is unlikely that they will be removing the bodies to troubleshoot problems or perform upgrades of any kind.
The last thing that is needed to insure that the cars will run smoothly and reliably around the track is to fan out or groom the pickup braids. This is done to maximize electrical conductivity from the track rails to the braids and, therefore, to the motor. One technique for doing this is shown in the following photos:

First, hold the car in one hand with the braids facing up and clearly visible as in the photo below left. Next, grab the car firmly with both hands between the forefingers and thumbs, with the thumbs directly over one set (left and right) of braids. With both hands holding the car firmly in this position, push the braids forward in the direction of the red arrows with the thumbs repeatedly as though you were rubbing them as shown in the below right photo.
This will loosen the tight weave of the braid material and the braid will start to fan or spread out. Repeat with the second set of braids until both sets appear as shown in the photo below. There are also other ways to accomplish this. For example, gripping the braids on each side with two pairs of needle nose pliers to gently pull the braid material apart.
Once the braids are fanned properly, tilt them down from the guide at about a 30° angle so that they appear as shown in the following photo.

Now the Carrera GO!!! Power Grip set is ready for racing!

Performance

The first time I ran the cars on the track I was alone, so my attention was concentrated on the limits to which the cars can be run on such a small layout. These limits are surprisingly high — as long as the Turbo button is not pressed. Using the full throttle range without the spacers produced what I would describe as competent, controlled running of the cars. The magnet is effective at keeping the car in the slot, especially on curves, but the throttle must still be used or the car will de-slot in the inside turn lanes (without guard rail). Frankly there is not a lot of technique to be applied here, but the handling is smooth and predictable on the flat, even Carrera track surface. The layout is far too short for any reasonable use of the Turbo button, especially by children. Even my initial use of the button resulted in cars flying off the track. But even with such short straights and tight turns, this feature can be exploited. With some practice I found a method of tapping the Turbo button with the forefinger at the beginning of the straights on the outside lane(s). This would provide just enough of a power burst to thrust the car through the following turn without de-slotting. Not exactly a classic slot racing technique but it did make the running more interesting.

Next, I packed up the set and took it on the road to a Super Bowl weekend gathering of friends. None of the attendees are slot racing regulars, but some have raced on my home 1/32nd scale track and enjoyed the experience. The set turned out to be somewhat of a diversionary hit with the party goers, who were all adults. This was the first chance to put the set and cars through the paces of actual racing and I believe that it acquitted itself admirably. After just a few laps everyone was able to run the cars close to their limit consistently while staying in the slot. This produced some close racing and seemed to hold the racers' interest throughout the entire weekend that I was there — with the sole exception of the Super Bowl itself. But that's another story.

But I had yet to see how the Power Grip set would fare in the hands of a youngster. Luckily, my 11 year-old niece came to visit.
When she arrived, I said very little beyond hello and a hug. Then I pointed her toward the race track table and just observed. After a few minutes and one or two general questions, the cars were whizzing around the tiny layout with surprisingly few breaks in the action. The only instruction that I gave her was to not push the Turbo button. That happened only once and it was by accident. She and her mom then raced for about 45 minutes and it became very competitive. Toward the end, her mom was getting very aggressive, especially at the crossing intersection, to the point of being downright nasty. So, I made them both hot cocoa and sat them down in separate rooms. Just kidding — they were in the same room. But, there is no doubt that they had many fun!

Summary

After initially setting up the layout and seeing the small size I thought that it might not be sufficient for any kind of reasonable slot racing. However, after using the set in the previously described environments over a period of several weeks, any doubts that I may have had about its validity as a slot racing track were erased.

There are only two issues that I have with this Carrera GO!!! race set:
  1. The Turbo button. Perhaps it has a place on a larger layout with longer straight sections, I can't make that judgement yet. It would be nice if it could be disabled.
  2. The crossing intersection. It's undoubtedly fun for the (some) kids. However, it is a quick path to the eventual destruction of any cars that run on the track. My Niece thought that a flyover would be better for racing.
In conclusion, I give the Carrera GO!!! Power Grip 1/43 Race Set a high mark. I feel that overall quality of the cars, track and all other components is excellent. Like all slot car systems in any of the available scales it is easily expandable with track sections, cars and accessories that are readily available. And for the casual or younger racer who may be experiencing the hobby for the first time, it can hold its own. 1/43rd scale is a great way to get into this hobby and I can recommend the Carrera GO!!! Power Grip race set without reservation.


Thanks to BRS Hobbies who made this review possible by providing the Carrera GO!!! Power Grip set featured in the article.

_Michael Ashton

Saturday, January 4, 2014

Tuning the New Carrera GT Slot Cars for NINCO Track

By Michael Ashton

Just about every slot car made has certain characteristics that are necessary for good performance on any track. Round, true wheels and tires; well matched, smooth meshing gears; a soft tire compound that provides adequate grip and a host of other design criteria that collectively define a "good" slot car. However, even though the general criteria may have been met, there are always issues that are unique to the specific track surface that must be dealt with in order to facilitate good performance and, therefore, a satisfying slot car experience. The differences presented between a routed wood track and sectional plastic track are obvious. But the differences between the major slot car manufacturers' plastic track surfaces are also significant. And it is common knowledge that these same manufacturers design and construct their cars to perform best on their own particular track surface.

Carrera has been producing some really nice 1/32nd scale cars lately, especially in the GT and DTM classes. I have acquired several of these cars and my impression is that Carrera has made significant strides in both performance and appearance, while maintaining a very reasonable price point. Remember though that these cars are optimized for Carrera 1/24 track. And the differences between Carrera and NINCO track are neither subtle nor trivial. To Summarize:
  • Carrera 1/24 track has a smooth, rigid surface. The NINCO surface is rough and can be irregular in the sense of an actual paved surface.
  • Carrera 1/24 track has a deep, wide slot. The NINCO slot is relatively deep but much narrower.
  • Carrera 1/24 track rails are flush with the track surface and are made from low ferrous stainless steel which minimizes magnetic down force. The NINCO rails are raised above the track surface and are made from mild, high-ferrous steel which accentuates magnetic down force.

This means that it is unlikely that these cars will run really well out-of-the-box on NINCO track. In fact, the stock Carrera guide, made for that deep and wide Carrera slot, can prevent the car from running on NINCO track at all. So, here are some really attractive model cars, at a very good price and I want to run them on my NINCO home track. The questions for me are: can they be made to run well (really well) on NINCO track; and at what cost; and how much skill and effort will be required? In other words, will the affordability of the Carrera cars be eclipsed by the need for aftermarket parts or special tools? The rest of this article documents my efforts to tune a Carrera GT for NINCO track and hopefully answers those questions.


The Car

I have a number of GT cars from various manufacturers and I have to say that it is a slot car class that I really enjoy. The cars look good and usually handle very well as slot cars go. One car make that I did not have was an Aston Martin. So when I saw how attractive the Carrera release of the Aston Martin V12 Vantage GT3 looked I decided without hesitation to get it to run on my NINCO track. And hopefully not just run, but run well. Competitive with other GT cars in my collection.


My initial reaction to the Aston Martin Vantage V12's appearance is that Carrera is maintaining, and even enhancing, their commitment to quality and detail with each new model that they release.


Paint, Tampo printing, fit, finish and level of detail of this model are as good as any from a mainstream manufacturer in my collection.


The Carrera chassis is typical of their GT offerings that I have seen over the last year or so. It still uses their proprietary guide/braid system and the direction reversing switch circuit, however, it is much lighter and simpler overall than the typical Carrera chassis of just a few years ago. The motor is the tried and true (and consistent) E-200 which produces about 20,000 rpm and 100 gcm of torque at 12 volts. The motor is coupled to a nylon 27t/9t gear system that is remarkably smooth and quiet.


Out-of-the Box Evaluation

The Carrera Aston Martin V12 Vantage comes with the now familiar pair of bar magnets installed. One just in front of the motor mount and a second, narrower, just behind the motor mount underneath the pinion.

--- Mid-chassis ---               -------- Rear --------

Both magnets come with a metal shim, or spacer, that allows the magnet to be raised a slight amount in its holder. This effectively provides eight distinct down force settings. The factory configuration has the spacer installed below the magnets, therefore, in the raised position.

I can't bring myself to remove a new car from the box, place it on the track and start running immediately. So, I lubricated the motor armature with a micro drop of oil at each end and ran the car with the rear wheels raised off the track at about four volts. Bushings and gears were already well lubricated. After about ten minutes of this simple break in procedure, I placed the car on the track and began running laps. Actually I should say lap. The car could not travel more than 24 inches with the long and thick stock Carrera guide in the narrow NINCO slot. Of course this was not a surprise, but in the interest of being thorough and methodical, it had to be attempted. Regardless, the solution to the problem was already in hand.

The black guide pictured below is the stock guide that is installed on virtually every Carrera car at the factory. It is designed for the deep, wide slot of Carrera 1/24 track. It also is very effective in routed wood tracks where a deep wide routing bit has been used. Unfortunately, cars equipped with this guide are virtually undriveable on NINCO, Scalextric [Classic] and SCX track due to binding in the narrower slots of these track systems.


The solution to the problem is the red alternative (replacement) guide, part number 85309 available from Carrera, pictured above and far right. This guide is shorter, thinner and slightly shallower than the stock guide. Installing this guide in the Aston Martin solved the problem immediately.


I feel that the two stock magnets in their raised position provide all the down force necessary to achieve the lowest lap times possible at a given voltage on NINCO track. I ran the car this way for about 100 laps. Although the car was quite "stuck down", it was still necessary to operate the throttle through turns, although the rear end would not slide prior to "snapping" out of the slot due to exceeding the narrow adhesion threshold characteristic of high down force racing. The motor became only mildly warm to the touch and I would say that the car was fun and interesting to run this way. My fastest lap was 6.388 seconds which I believe to be as fast as the laws of physics will allow on my track. Lap times were consistently in the mid 6 second range. I'm confident that most hardcore hair-on-fire magnet missile aficionados would be reasonably satisfied with this performance and could easily improve on it.

For this type of racing I don't think that there is any further tuning that would yield measurable improvements in performance. At this point I consider the Carrera Aston Martin V12 Vantage to be a very good running magnet racer on NINCO track. However, I would like the car to run just as well with much milder magnetic down force and/or no magnet at all. This fits with my personal goal of superior performance that is also realistic to watch and more subtle to achieve through the controller.


Tuning

First I removed the rear magnet and left the mid-chassis magnet in place in its raised position, running about 25 casual laps. Next I removed the mid-chassis magnet and ran another 25 laps. I didn't bother running with the rear magnet alone because the performance is not that much different than an LMP car. In any event, low mag and no mag performance were not inspiring to say the least. There was noticeable hop/chatter when powering through "S" turns and spontaneous desolating when accelerating out of some turns. But that wasn't surprising given the pedigree of the car. It is designed for magnet racing on a much smoother surface. Nevertheless, I sensed that better low/no mag performance was not only attainable, but not that far off.

At this point it would be easy to start chopping up the chassis and replacing parts. Install an aftermarket guide assembly, aluminum setscrew wheels, Slot.it drive train, etc. And there is no doubt that this would result in a much better performing slot car. But these are cars that are intended for the home racer and track. Casual slot car enthusiasts like myself who don't have a tire/wheel truer or a machine shop at their disposal. So my goal was to achieve the maximum improvement in performance possible without incurring additional expense and by relying solely on my limited but tenacious tuning talent.

From my standpoint, the basic foundation of a good running slot car was already in place: the tires and wheels are round and true; the tire compound provides more than adequate grip; the chassis and body, although characteristically on the heavy side, are straight and absent any distortion; all moving parts have adequate clearance with body/interior/chassis; and the drive train is sound. That being the case, in my experience the most important tuning opportunity lies in optimizing guide position relative to the rails and creating unrestricted float between the body and chassis.

The Carrera guide in their GT chassis' tends to ride a little high. This can be seen when the car sits in a slot on a flat surface such as a set up block. See the photo below:


However, the raised rails of the NINCO track tend to minimize this issue, especially when running with [even a mild] magnet. Also, the Carrera braids are relatively thick and stiff which tends to preclude the need for a truly planted guide. The photo below shows good braid-to-rail contact and a guide flag that sits reasonably low in the slot. This proved to be adequate for the low mag configuration, therefore, nothing was done to the guide for low mag operation.


Next is the issue of body float which, in my opinion, is the most important issue for low/no mag operation on NINCO track. This is because the rough track surface produces very high grip, especially during steep acceleration in turns. If the body is fastened tightly to the chassis or is in contact with the chassis edges, the inertia of the body is transferred to the chassis. This will result in wheel chatter during braking into or acceleration out of a corner, and/or de-slotting due to rolling or front end lifting when exiting a corner. Normally, loosening the body mount screws one or two turns will alleviate these problems. However, there are some design issues which require a little more effort for the Carrera cars.

A very common problem that can inhibit a free floating body is contact between the sides and/or ends of the body and the edges of the chassis. The Aston Martin side panels are a snug fit to the chassis and were definitely contacting, or catching on, the sides of the chassis, as pictured below.


Using a sanding or emery board, file the edge of the chassis along the area where the body panel is touching. The following photo shows the same area after sanding. Note the small, uniform gap that now exists between body and chassis.


The next issue, pictured below, are the rear body mounting post (left) and and the corresponding mounting base of the chassis. The base has a lip that surrounds the post and the post has two tabs (red arrows) that fit into slots in the base's lip. Presumably this is intended to maintain body/chassis alignment by preventing any horizontal play between body and chassis. The two front mounting post/base combinations are similar. This system of mounting is found in a number of slot cars. In the case of the Aston Martin, the combination of the lip and tabs creates a very tight virtual "snap" fit that effectively prevents any body float at all—even with the body mounting screws loosened.


One solution that has been used in the past is to grind/file away the mounting base's lip. But the mounting base's in this car are difficult to access for filing and this would still leave the tabs to possibly interfere with body float. So, I decided to deal with the mounting posts alone.

The following photo shows the modifications applied to all three mounting post(s). Approximately three millimeters of the tabs was removed at the end of the post, shown by the red arrow. Then the edge of the post's end was beveled (rounded) so that it no longer catches the mounting base lip when the body moves vertically or at an angle, indicated by the yellow arrow. The only tools required for this modification are a sharp hobby knife and a narrow emery board.


The body was reinstalled on the chassis and the three body mounting screws were loosened by two full turns from the tight position. The effect of introducing unrestricted body float was immediately positive and measurable. Lap times without a magnet were consistently in the 8.6 second range with a fast lap of 8.375. With the mid-chassis magnet installed lap times dropped to a 7.5 second average with a fast lap of 7.297. These are very respectable times on my track. More importantly, there was no chatter in the turns and the car exhibited no tendency to de-slot unless clearly overdriven in the turns.

The only remaining issue with body float was the mounting screws themselves. Carrera uses a relatively wide diameter screw with a deep thread. This was causing the screws to catch on the edges of the chassis mounting hole when the body moved vertically. Therefore, a 1/8" drill bit was used by hand to increase the chassis mounting hole size ever so slightly. Please note that I'm referring to the chassis mounting holes—not the body mounting posts. This eliminated the mounting screw rubbing problem. Now the body truly floated over the chassis, while still secured by the mounting screws.

The final action taken was to lower the guide flag. There are only two ways that I know of to lower the Carrera guide assembly. One is to lower the front ride height, either by installing lower profile tires or modifying the front axle bushing holders to allow the bushings to sit higher in the cradles. The other is to replace the entire guide assembly with an aftermarket assembly such as B-NOVA and a NINCO guide. Neither approach would fit with the goal of no additional expense and no significant surgery.  Although I believe that the vertical position of the stock guide assembly is adequate, I decided to shim the guide flag to see if any advantage could be gained. The flag (or keel) of the Carrera guide is a separate piece that can be lowered with a properly configured shim. In this case, a #8 nylon washer with the sides trimmed to the same width as the guide flag's base. This allows the washer to fit snugly between the braids and keeps the vertical tab at the front of the flag positioned properly inside the slot of the guide assembly swivel plate.


The guide flag now sits about 1.5 mm lower in the slot as can be seen clearly in the following photo.


Lowering the guide flag in this fashion did not significantly reduce lap times, however, it did make them more consistent. Now there was a sense that the car could be driven a little harder into and out of the turns. I would consider lowering the guide flag to be less than critical to obtain better performance, but well worth trying, especially for no-mag running.

The following table lists lap times for all the various tuning steps and combinations of magnet placement. Lap times from the third row on were recorded after all tuning steps were taken. The final row times reflect the shimmed guide flag. These times are comparable to NINCO 1 PLUS GT's that run very well on my NINCO home track.


All testing was performed on my relatively twisty 61' NINCO home track:
  • Power: Pyramid PS-26KX @ 12 volts.
  • Throttle: NINCO 55 Plus.
  • Timing: Lap Timer 2000 with homemade IR light bridge.

Tools required for all modifications:
  • Hobby or utility knife with a sharp blade.
  • Medium grit emery board or sandpaper.
  • 1/8" drill bit (turned by hand).


Summary


The Carrera Aston Martin V12 Vantage is now, by far, the best running Carrera car on my analog NINCO track. And the only additional expense incurred was the cost of the smaller Carrera alternative guide flag which is obviously negligible. It's likely that performance could be enhanced even further with the aftermarket parts replacements previously mentioned. However, in my case the goal is not to compete with Slot.it and NSR. The goal is to optimize performance of a stock Carrera GT car on NINCO track. I believe that has been accomplished. The Carrera Aston Martin V12 Vantage is now fun to run. My preferred configuration is with the mid-chassis magnet installed over the spacer. This yields performance that is very similar to no-mag with just enough down force to allow moderately aggressive driving through the turns.

If you run on NINCO track and are contemplating the acquisition of a recent Carrera release, or already have one that is not performing as well as you would like, try these tuning actions. You will have virtually nothing to lose and I'm confident that you will be pleased with the result.

This article is a service to our slotting friends made possible by BRS Hobbies, who kindly provided the Carrera Aston Martin V12 Vantage "Young Driver" slot car reviewed here.

_Michael Ashton

Friday, November 15, 2013

THEY'RE BACK!


NEW RELEASES


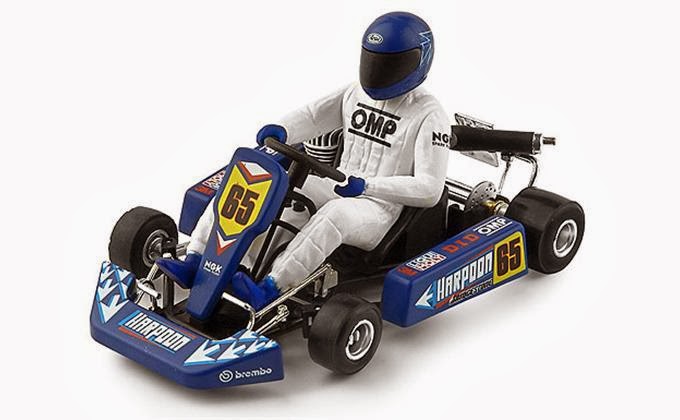
The last NINCO Go-Kart was released in 2006. So, after a seven year hiatus, fans of these unique and exciting slot vehicles as well as enthusiasts who missed the opportunity to acquire one, have cause to rejoice. Two new versions of the NINCO Kart are about to be released. The Harpoon and Eagle Karts continue the original configuration of previous releases, including the NK-1 motor in angle winder setup.


NINCO SPORT KART "HARPOON" 1/18 SLOT CAR #50640
NINCO SPORT KART "EAGLE" 1/18 SLOT CAR #50641

Wednesday, October 30, 2013

NINCO News October 2013

NEW RELEASES


NINCO SPORT LANCIA 037 "TOTIP" 1/32 SLOT CAR #50637

This addition to the Lancia 037 line features the striking and instantly recognizable Totip livery. This particular car participated in the 1983 Sanremo Rally in Italy. This NINCO Sport entry is fitted with the NC-9 Sparker motor, in-line 9/27 gears and ProShock suspension.
NINCO LIGHTNING AUDI R18 "SPA 2011" 1/32 SLOT CAR #50642

NINCO introduces another formidable performer to the stable of Audi R18's. Featuring an in-line drive train with the NC-5 Speeder motor mounted in a ProRace adjustable motor pod, 9/24 ProRace gears, machined aluminum setscrew wheels and adjustable front ride height. Entered in the 2011 1000 km of Spa by Audi Sport North America where this R18 Ultra finished 3rd.
NINCO 1 FORD MUSTANG "CAPALDI" 1/32 SLOT CAR #55094

Here is a nice new decoration of the NINCO 1 Ford Mustang that was driven in the BMW Performance 200 at Daytona International Speedway by Craig Capaldi. This version is equipped with standard NINCO 1 mechanicals plus something new from NINCO —  LIGHTS!  Xenon headlights and taillights are factory installed.
NINCO 1 AUDI R8 "RUM-BUM" 1/32 SLOT CAR #55095

What could look better on the track than an Audi R8? An Audi R8 Rum Bum! This fun and interesting looking decorated car by Rum Bum Racing debuted in the 2013 Rolex 24 Hours at Daytona International Speedway where it missed a podium finish by just 1/2 lap. This NINCO 1/32 slot car features an NC-11 motor, 12/32 gears in angle winder configuration and is the second NINCO 1 release to be factory-fitted with Xenon headlights and taillights.

Tuesday, October 1, 2013

NINCO News September 2013

NEW RELEASES

NINCO SPORT FORD SIERRA "LABATT'S" 1/32 SLOT CAR #50635

This Team Labatt's version of the Ford Sierra RS500 was driven in the 1990 British Touring Car Championship to a 3rd place finish by Lawrence Bristow and Thomas Mezera at the Donington Park circuit. The NINCO entry is fitted with the NC-9 Sparker motor, in-line 9/27 gears and ProShock suspension all around.
NINCO SPORT CORVETTE '56 SR-2 "BLUE" 1/32 SLOT CAR #50636

NINCO's second decoration of the mysterious and enigmatic SR-2 series of Corvettes. These cars competed successfully in many American road races in the mid-1950's and set class records for the flying mile on the beach at Daytona, Florida. This NINCO Classic is equipped with an NC-5 motor and in-line 9/27 gears.
NINCO 1 CHEVROLET CORVETTE "MAD CROC" 1/32 SLOT CAR #55090

This latest NINCO 1 C6-R Corvette features a stunning and interesting decoration of the car driven by the Mad Croc racing team in the FIA GT1 World Championship racing series. This is a standard NINCO 1 mechanical implementation with NC-11 motor, tinted glass and 9/27 in-line gears. 
NINCO 1 CHEVROLET CAMARO "AUTOHAUS" 1/32 SLOT CAR #55092

Drivers of the Autohaus Motor Sports Team drove the Number 88 Camaro to a 1st place finish in the GT class of the Chevrolet Grand Am Detroit 200 race at Belle Isle Park. This is a standard NINCO 1 mechanical implementation with NC-11 motor and 9/27 in-line gears. 
NINCO 1 MERCEDES SLS "DUBAI 2013" 1/32 SLOT CAR #55093

NINCO introduces the Mercedes SLS driven in the Dubai 24 hour endurance race by the Black Falcon racing team. This NINCO 1 car comes equipped with an NC-11 motor, adjustable ProRace motor pod and 12/32 gears in angle winder configuration.