Showing posts with label 1/43 Slot Car Reviews. Show all posts

Saturday, November 18, 2017

Carrera GO Plus Night Chase Race Set Review

Carrera GO 1/43 slot car products have been around for quite some time and have been providing a lot of fun to families and friends.  Carrera has recently launched Carrera GO Plus in the USA which adds a lot of new features including a 1 player mode in which you can race against a ghost car (autonomous car) as an opponent and the ability to display race information on a phone or tablet.  This Carrera GO Plus Night Chase 1/43 race set review will walk you thru all that Carrera GO Plus has to offer.

To get started, here is a picture of the front of the race box.
Then to open up the race set you need to open up one of the side flaps, then slide out the cardboard tray that holds the contents out of the race set box.  It's important to pull the handle out as you do this, otherwise the cardboard tray will hang up on the ends of the handle that are inside the race set box. 
The cardboard tray does a nice job of holding the contents of the race set and each type of track piece is nicely shrink wrapped together.  I found some care needs to be taken when removing the shrink wrap from around the track.  I recommend cutting the shrink wrap off rather than just trying to puncture and pull it off by hand.  This will help to protect the track tabs that stick out on each end. 
The assembled track layout size is 9.02 x 4.17 feet so be sure you find an area large enough for the layout.  You could also alter the layout slightly to change the footprint size as needed. I chose to set up the track in our basement on a carpeted floor.  Before doing so, I recommend vacuuming the carpet and then setting down a tarp or heavy duty plastic table cloth.  This will serve as a barrier between the carpet fuzz and the track and cars.  Carper fuzz can get in the car's wheels and axles over time which can eventually slow the cars down and diminish their performance.

Another cool option is that the directions show how to set up the track with or without the loop.  The loop can be challenging for some, so if it is your first time racing on a Carrera GO track, then you may consider setting up the layout without the loop.  You can always add it later on.  The layout assembly directions are a diagram with each part lettered.  The underside of the track pieces have a letter which really helps to identify which track pieces go where. 
Assembling the track is one area that can be a bit tedious, especially the first time since some of the track pieces can be a little challenging to get together.  You basically want to push the track pieces together evenly.  I found some track pieces were really easy to put together and some were a little more stubborn.  For the track pieces that you are having a tougher time with it, it really helps to push the pieces together evenly until you get a 1/8" gap or less.  Then push one side together and then the other.  A few pieces didn't seem like they would go together so I moved them some where else in the layout and all went together just fine. The bank curves also seemed a little more difficult to assemble then the flat track pieces.  The main thing is to set up the track (especially the first time) with an adult or with adult supervision while taking a little extra care not to over stress the track connecting tabs.

This set also comes with some new easy to attach red track supports. They are easy to install once you find the place that they attach to on the underside of the track.  I tried putting the supports according to the instructions but did find that some of them weren't touching the floor so I moved them around until I found a place where each support touched the floor.

The total assembly time was about 45 minutes, I am sure subsequent assembly times will be quicker since you will have a better idea where all the track pieces go and the track pieces will be easier to put together.  The track layout itself is a fast flowing track with plenty of banked curves, R2 curves, intersection and a narrow straight.  The layout only has 4 R1 curves which are the smallest radius curves but banked for higher speeds.  This ultimately means that the cars can be driven faster with fewer de-slots than those Carrera GO layouts that use the R1 flat curves. 
This Carrera GO Plus Night Chase race set come with two Lamborghini Huracan LP 610-4 1/43 slot cars, the Miami Police with flashing roof lights and the street Avio with ground effect lighting.  The cars measure approximately 4.125 inches long by 1.250 inches wide.  Both cars are super cool and very well detailed.  Before running the cars, it's important to fan out the braids and position them as shown in the instructions.
The Carrera GO Plus connection track really adds to the racing experience and can be used with or without the App.  You get three race modes - 20 or 30 lap race, chase which gives one car a head start and the other car has to catch him and training with no lap restriction.  Additionally, you have the option of programming one of the cars or any other Carrera GO 1/43 slot car as a ghost car.  This is a great option for solo racing with the track.  When racing without the app, a fan fare sound is played and the winning car can continue driving while the losing car is stopped on the track.
One player mode is set up by switching to the ghost using the selector switch on the Carrera GO Plus connection section.  Then you position the car to be programmed in the red lane about one standard straight or 12 inches behind the start/finish line.  Press the Plus button on the power base and drive two complete laps stopping before the start/finish line (where you started).  You will then get a sound signal after a few seconds letting you know that the programming is complete.  Unplug the controller that you used to program the ghost car, select a race mode and then start the race.  The ghost car will actually speed up and slow down just as it was programmed around the track.  If the ghost car comes off the track, then you can restart it by pushing it at a normal running speed across the start/finish line.  In my opinion, this is a great feature and is great fun when using the track by yourself.

Now onto the Carrera GO Plus app which uses a Bluetooth connection to link your IOS and Android phone or tablet to the Carrera GO Plus connection track.  The main benefit is that you get the lap count and lap times for each car.  It also adds games that are sent randomly to one of the drivers while the race is in progress.  The driver in question is stopped on the track and the game either must be completed successfully or after 20 seconds will resume racing on the track.  This may be fun for some but I found it to disrupt the racing action too much and the games seemed to be more of a chore after awhile that you need to do just to rejoin the race.

The good news is I found a workaround for those who don't want to play the games.  In one player mode, the games are deactivated since the ghost car wouldn't be able to do them.  In two player mode, you only need to have the red lane controller unplugged when you first press the Plus button to initiate the start of the race countdown.  Once the countdown starts, you can then plug in the controller and race with two drivers without the random games coming up during the race.
This set has provided many hours of fun both racing solo and with other drivers.  The controllers also have a turbo button which gives you a higher top speed that when perfected helps getting a little extra speed and into the loop. The intersection adds a lot of excitement to the racing, since if you don't time it right the cars run into each other and will most likely come off the track.  The cars run really smooth, are plenty durable and the lights are neat for racing with low light in the room.  I find the skill level of the race set to be just right since you need to drive the cars somewhat around the track but not so much that it gets frustrating.  We have had kids and adults of different skill levels use the track and all were able to get around the track just fine (some faster than others).  The only issue is that one of the cars started making a squeaking sound.  I put a drop of plastic compatible oil at the interface of the chassis and the axles (4 spots) and the sound disappearedThen the car ran even smoother due to the oil reducing the friction of the axles.

Is Carrera GO Plus worth it?  I say yes.  It adds the ability to run properly scored races, gives the option to run against a ghost car and shows lap times with the app which is good for fine tuning the cars.  The Carrera GO Plus connection track will also be available separately in the near future.  If you have one of the newest Carrera GO race sets that come with red controller plugs than you only need the Carrera GO Plus connection track to convert an existing Carrera GO track to GO Plus.  If you have a Carrera GO track with black controller plugs, then you will also need two Carrera 20061663 GO Plus Controllers.

This Carrera GO Plus Night Chase 1/43 race set is available for purchase right now at BRS Hobbies for $ 135.99 with FREE shipping within the United States.  Here is the link - Carrera GO Plus Night Chase Race Set

Thursday, February 26, 2015

Carrera Digital 143 2.4 GHz Wireless Controllers

By Michael Ashton

Carrera released the DIGITAL 143 2.4 GHZ WIRELESS+ CONNECTING SECTION INCLUDING 2 HANDSETS 42013 and the individual 2.4 GHZ WIRELESS+ HANDSET 42012 toward the end of 2014. Carrera and other manufacturers have offered 2.4 GHz wireless controllers in their 1/32nd scale digital and analog systems for some time now. So why is the appearance of another digital accessory worth any special attention? Well, read on and I will tell you why.

The 2.4 GHz wireless controllers for Digital 143 are actually two distinct products. The first consists of the connecting [track] section and two hand controllers. The connecting section houses the Digital 143 system electronics and the wireless interface for the controllers.


The second product is an individual hand controller that is added to the system to complete the full compliment of three controllers.


The wireless connecting section is installed in the layout exactly the same as the Red Box. The wireless system replaces the Red Box so the two systems must never be connected in the layout at the same time. Doing so could damage one or both system components. The D143 power pack (transformer) that came with the Red Box is used to provide power to the wireless system.


The controller gets its power from a rechargeable LiPo (lithium-ion polymer) battery. The controller is shipped with the battery not installed. The following illustration from the Carrera Digital 143 Wireless+ user guide shows how to install the battery:

  1. Remove the battery compartment cover from the base of the controller by loosening the screw that secures it.
  2. Connect the battery plug to the socket inside the battery compartment and push the battery up into the compartment.
  3. Replace the compartment cover and secure it with the screw that was previously removed.
The battery charges whenever power is on and the controller is sitting in its cradle. The LED on the top of the controller flashes while charging and is off when fully charged. Although the batteries are shipped in a charged state, Carrera specifies that they should be fully charged by the user before the first use.

The D143 14.8 volt 700 ma power pack plugs into the socket on the right hand side of the connecting section. System power is applied by sliding the on/off power switch toward the track. The system status LED illuminates when power is on.


Carrera lists the electricity modes in the user guide, however, I find the descriptions to be somewhat confusing. As far as I can tell, there are three distinct modes:
  1. Operating mode: cars are being actively operated by the controllers.
  2. Idle mode: After about ten seconds of controller inactivity idle mode is entered. The status LED is illuminated, however, there is a slight delay in initial car movement when the throttle plunger is first depressed. 
  3. Stand-by: When the [live] power pack is first plugged in, and after about 20 minutes of complete inactivity, the status LED extinguishes. The power switch must be toggled off then on to return to idle mode.
Before starting a race, I recommend briefly depressing each controller's throttle plunger to make sure that it is not in idle mode, thereby avoiding any momentary delay that could affect the start of the race.

Controller ergonomics are at least as good as the D143 wired version. The only real physical difference is the base that holds the wireless electronics extending slightly below the finger grips.


The top of the controller houses the recessed black programming button and the red activity LED.


Programming the cars

The new wireless system has simplified the process of programming or, assigning a car to a controller (not that the previous method was really very complicated). The following illustration from the Digital 143 Wireless+ user guide shows how a controller and car are bonded, or coded, to the connecting track:

  1. Place a car on the track in the slot.
  2. Depress the desired address button (1, 2 or 3) on the connecting track controller cradle. The status LED on the side of the cradle will flash.
  3. Press the small black button on the top of the controller located behind the throttle plunger (this must be done within one second of step 2 above).
Coding is confirmed by an audible tone and a single flash of the red LED in the controller’s top. The prior method of coding using the lane change button supported by both D143 and D132 can still be used, if desired.

Note: it is important to keep track of the bonding of controllers to addresses. It is possible to bond multiple cars to the same controller, which may or may not be intended. Only one controller may be bonded to a single address.


A Nice Surprise

Much to my surprise, the new wireless system has an autonomous (ghost) car function built in! Any active controller/car combination can be instantly set to be an autonomous car with a single button click:

  1. Depress the throttle plunger to bring the car up to the desired speed.
  2. Press the associated address button on the connecting section.
The car will now maintain the current speed and will change lanes randomly. Note that the autonomous function actually resides in the controller, therefore, all cars bonded to the controller will behave as autonomous cars. Because all cars bonded to the controller will have the same address (ID), if multiple cars bonded to the controller are running simultaneously, each car will increment the lap count as it crosses the detector if the D143 Lap Counter is installed.

The autonomous car will automatically stop after ten seconds if there has been no throttle activity for all cars on the track. Depressing any throttle will restart the autonomous car. Autonomous car programming remains in place until either the car is recoded or the ON/OFF switch is actuated.


Performance

I have been running with the D143 wireless system installed in my NASCAR oval for over a month now. And while not a rabid fan of the plunger-type throttle control, the D143 wireless controller felt both comfortable and natural in my hand during operation. I have not had the opportunity to observe a youngster using the controller, however, my wife, who has quite small hands, did not experience any difficulty in operation when compared to the wired controller.


While running a variety of cars, including Carrera D143 and SCX Compact, I could not detect a difference in either throttle response or power band between the wireless and wired controllers. Lane changing is extremely reliable in the D143 system and does not appear to be diminished at all by the wireless system. Carrera specifies the operating range of the 2.4 GHz system to be up to 15 meters. The limits of the room that houses my track allowed me to stand about 16 feet away from the connecting section. I did not experience any performance degradation at this distance, which is much farther away than I would ever care to stand anyway.

The unique benefits of wireless controllers become obvious almost immediately: 
  • The ability to position drivers anywhere around the track.
  • Drivers’ new found mobility, allowing them to move around and especially to marshal a de-slotted car while holding on to the controller.
  • The elimination of the annoying tangle of wires.


      A Superior Product

      In conclusion, if there is a downside to the Carrera Digital 143 Wireless System, I have not found it. It certainly is not any of the following:
      • Price. The D143 Wireless System costs only a little more than half of its D132 “big brother” counterpart.
      • Performance. I found overall response and performance to be at least as good as the wired controllers. And the operating range is excellent
      • Functionality. Not only does the D143 wireless system provide all the obvious benefits of wireless operation, it also adds the autonomous car feature to D143!
      Kudos go to Carrera for adding this jewel to the Digital 143 system. It raises the level of stock D143 racing measurably for the majority of users who do not have the time, skill or resources to enhance their system by modifying it with Digital 132 components.


      Thanks to Brian at BRS Hobbies whose sponsorship and support made this article possible.

      _Michael Ashton

      Saturday, June 7, 2014

      Upgrading the Guard Rails on Carrera GO!!!/D143 Race Tracks

      By Michael Ashton

      Carrera GO!!! and Digital 143 race sets come with enough simple guard rails to cover each curve track section included in the set. These stock guard rails consist of a series of posts or supports that clip to the edge of the track section and a plastic strip that is threaded through the posts to create the barrier.


      They are relatively easy to install and usually keep the cars from flying off the turns, without creating a significant advantage for the outside lane. However, they suffer from one major flaw. Whenever a car makes contact with the barrier strip, the strip is pushed out of position as shown in the following photo. So the intended protection is temporarily lost until the strip can be readjusted to its original position. This tends to be a distraction that can interfere with the normal flow and pace of a race because, in addition to placing the car back in the slot, the barrier strip must be dealt with.


      One solution to the problem could be to glue the barrier strip to the posts so that it can't move. But for those who set up and break down a track frequently this might reduce flexibility and diminish the portable nature of the track system. Not to mention the slick, flexible plastic used for the barrier strip might not react as expected to being glued.


      A Functional Alternative

      Fortunately, a relatively inexpensive replacement for the standard guardrails exists, and it is designed specifically for the 1/43rd scale track by Carrera. A package of Carrera GO!!!/D143 Guard Rail Fences is shown below. Each section of fence covers a 1/90° curve track section and there are ten fence sections in the package (five red and five gray).


      Installing the guard rail fence sections is even quicker and simpler than the standard guard rails. The procedure is shown in the following photos:

      Slip the lower part of each clip under the outer lip of the curved track section.


      Then tilt the fence section upward, toward the opposite side of the track until the upper part of the clip snaps into place.


      The properly installed fence sections should appear as shown in the following photo.


      Simpler and Better, I Think…


      After installing the Carrera GO!!!/D143 Guardrail Fences and running the cars for a while, I found them to be definitely superior to the stock guard rails. I believe that there are at least four advantages provided by the guardrail fences:
      1. Because they are a single piece, they are easier and quicker to install and break down.
      2. They are more secure and, therefore, require no readjustment after contact with the cars.
      3. Because they are higher, they provide better protection against cars flying off the track in the turns.
      4. IMO, their appearance is more realistic — but that is just a preference.
      So, if you feel that the stock Carrera 1/43rd scale guard rails are less than optimal for your racing needs, I recommend that you install the Carrera GO!!!/D143 Guardrail Fences. I'm confident that you will find them to be a worthwhile improvement to your Carrera 1/43rd scale race track.

      _Michael Ashton

      Thursday, March 27, 2014

      Carrera D143 High Speed Chase 1/43 Race Set

      By Michael Ashton

      Recently, we ventured into the world of 1/43rd scale slot car racing by way of a review of one of Carrera's entry level GO!!! race sets in an article that can be seen here. The general conclusion was that 1/43rd scale slot racing affords very good value and is a great way to get into the slot car hobby on a casual basis, without the need for significant commitments of time, money and space. So, now that digital technology has found its way into this 1/43rd scale world, it seems like a natural progression to see what digital adds to the party and whether or not it is worthwhile or even feasible for the casual slot racing consumer.

      However, before jumping into the details of a specific product, let's look at a very brief summary of what makes a slot car track digital and what the differences between the conventional analog track and its digital counterpart are.

      When running on a conventional or analog slot car track, each lane or slot of the track accommodates a single car. The hand-held speed controller (throttle) varies the electrical voltage to the lane's rails, thereby controlling the speed of the car. A two lane track can accommodate two cars. Three lanes — three cars, etc. Therefore, there must be a lane for each driver who participates in a race. 

      There are two primary characteristics of digital slot car racing that distinguish it from analog:
      1. Digital allows multiple cars to share each lane of the track. If you have three racers but only a two lane track, they can all run concurrently in either lane of the track. This is accomplished by a digital chip (microprocessor) in each car that receives coded instructions from the digital speed controller about how fast the car should go and when to change lanes. It doesn't matter which lane the car is in because the instructions are sent directly to the digital chip. Of course a controller is still needed for each driver.
      2. Digital allows cars to change from one lane to another at specific area(s) of the track. Obviously, if multiple cars can be in the same lane, there must be a way to pass a slower or obstructing car in front. This capability is provided by special lane change track sections which allow a car to switch from its current lane to the adjacent lane when a button on the controller is pressed. This will be described in detail later in the article.
      This tends to provide several distinct (albeit perceived) advantages of a digital track over analog:
      • The number of lanes no longer limits the number of simultaneous race participants. So a track can require less relative space and people don't have to wait for a turn to race.
      • Racing can be more realistic and exciting because it is closer to actual conditions where split-second tactical decisions are needed to determine when to pass and selecting the best racing line. Just having three or more cars on a two-lane track can be very exhilarating.
      • If a car de-slots it doesn't matter which lane it is replaced in. Or if a car accidentally jumps into an adjacent lane (it happens) racing can continue uninterrupted.
      Carrera's line of 1/43rd scale digital slot racing products is called Digital 143, or D143 for short. The set that was reviewed for the purpose of this article is the Carrera D143 High Speed Chase Race Set. This is an entry-level digital 1/43rd scale slot car set that is clearly intended for casual/family slot car fun in the home. Prior to testing there were two questions that I felt were important:
      1. Generally, does the digital technology provide a worthwhile enhancement to 1/43rd scale slot racing (i.e., does it work well with the smaller scale)?
      2. Specifically, does this entry level set contain enough track and accessories to provide a satisfying digital slot racing experience? 
      The primary goal of this review is to answer those two questions.


      High Speed Chase

      First, a clarification: the Carrera D143 High Speed Chase Race Set is more of a game than a race. Yes, two cars are provided so technically they can be raced. However, lap timing/counting does not come standard. And the selection of cars — a "street" Ferrari F12 Berlinetta and AMG Mercedes SL-63 police car — indicates that the vicarious notion of outrunning and outsmarting the police in a hot sports car is more the order of the day than racing. Hey, I'm okay with that.


      Underneath the vividly illustrated box cover is a well designed Styrofoam carrier that provides convenient access to all of the set's components and should serve as a secure storage medium, when the track is not in use, for many years to come.

      Everything that is needed to set up a complete digital slot car track is provided:
      • Two impressive looking cars (described above).
      • Two thumb-trigger digital controllers.
      • A 14.8 volt 750 ma AC/DC transformer (more than enough power for the two cars).
      • One power/controller connecting track — a.k.a. the Red Box.
      • One "X" lane change track section that allows changing from either lane to the adjacent lane.
      • Functional guard rails for all curve track sections.
      • Spare braids and guide pins.
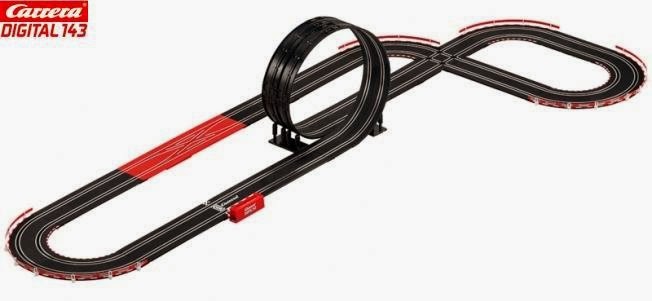
      • Enough track and accessories to create the layout (with some variations) pictured below.

      General information on setting up a Carrera 1/43rd scale race set can be found in the Carerra GO!!! Power Grip set review. This includes connecting track sections, power and controllers, optimizing cars for racing, and a lot more. Therefore, those subjects will not be duplicated here.


      The Track

      The High Speed Chase set contains the loop track accessory which has not been covered yet and does merit some discussion. Connecting the loop accessory is not difficult, however, there are a few points that are good to know about, especially if dealing with the loop accessory for the first time. Shown below are the track sections and associated components.

      There is a total of eight loop track sections (four for each lane). I recommend assembling the two loops prior to attaching to the main track.


      There are two types of track clips that are specific to the loop. These clips are needed to keep the two lanes of the loop aligned and to increase stability of the structure. 


      The single-sided clips are used to add stability to the outside of each loop's connections (red arrows below). The double-sided clips snap into the inside connections and keep the two lanes aligned, as show by the yellow arrow below. There are enough clips to accommodate the three joints of the loop itself.


      Once the entry and exit ends of the loops are attached to the main track, the loop structure must be supported at both ends. Four track elevation supports are provided for this purpose.


      Each support has two vertically adjustable towers that are assembled as shown in the following photos. First, the hollow threaded set screws are pressed onto the posts on the support base. Then the elevation cylinders are threaded onto the set screws as shown below.


      After pressing the connection caps onto the top of the adjusting cylinders, the assembled support should appear as seen in the photo below.


      The nipples on the connecting caps snap into receptacles on the underside of the loop track sections that connect to the main track. The cylinders are then adjusted up and/or down until the loop is rigid and the support bases sit flat on the table or floor surface.


      For me, setting up the loop was the trickiest and most time consuming part of the entire assembly process. Over time, I imagine that proficiency will increase, however, when the track is disassembled and stored, I would recommend leaving as much of the loop section and supports "preassembled" as possible.

      Connecting the speed controllers and power to the track is virtually identical to the analog GO!!! sets. The major difference is that the D143 Red Box allows up to three controllers to be connected. All controller connection receptacles are in the top of the Red Box, while power is connected in the receptacle at the right hand side. Controller connectors fit only in the controller receptacles while power will only fit in the power receptacle. Therefore, incorrect connections are prevented. The following photo shows the two controllers and the dc power supply of the High Speed Chase set properly configured. 


      Once all track, power and controller connections are made you will have a finished layout that should look similar to the one in the following photo. This track sits on a 4' x 8' plywood sheet. The layout itself requires an area of about 7' x 3'.


      The Controllers

      The digital speed controllers supplied in the High Speed Chase set are the thumb trigger, or plunger type, similar in appearance to the analog GO!!! controllers. The external appearance is the only thing that the D143 and GO!!! controllers have in common. The plunger (throttle) is still used to vary the speed of the car, however, the button at the top of the D143 controller (shown by the yellow arrow in Figure 1 below) is used to change from one lane to the other. More on that a little later.

      Figure 1
      The controllers come fitted with a spacer which limits the downward travel of the thumb trigger, shown by the red arrow in the following photo of a Carrera GO!!! controller. This works effectively as a governor on either the analog or digital controllers, and is a nice feature for very young and/or inexperienced drivers, allowing the cars to stay in the slot while experience and confidence are acquired over time. The spacers are easily removed and reinstalled.


      The Cars

      The Carrera D143 High Speed Chase set comes with two cars: a Ferrari F12 Berlinetta and AMG Mercedes SL-63 polizei (German for police) car, complete with flashing blue lights on the roof. Both cars are well detailed and seem to display reasonably good scale accuracy. I feel that the good quality and realistic appearance exhibited by these cars adds significantly to the appeal of this slot car set.

      The Ferrari red body color is molded in the plastic and all graphics are decals. The body, apart from the windshield/window areas, is clear coated. The Mercedes body primary and secondary colors are painted and all graphics are Tampo printed. The Mercedes does not appear to have a clear coat. Detail, fit and finish of both cars is above average for any type of model car.


      This Digital 'Thing'

      So, what is this digital thing all about? Let's take a look at what makes this a digital slot car track — without getting too technical.

      First is the fundamental ability to have more than one car per lane. This is facilitated, as previously described, by the in-car digital chip which allows the speed (and other aspects) to be controlled regardless of which lane the car is in by linking each speed controller to a specific car's digital chip. Figure 2 (left) below, shows the Carrera D143 digital chip in the chassis of the typical Carrera D143 car.

      Figure 2
      Second is the ability to change lanes, also described previously. Lane changing is made possible by a special red colored track section, shown in the following photo, that is able to divert the cars from their current lane to the opposite or, adjacent lane. To change lanes, as the car approaches the lane change track section, the lane change button on the controller (yellow arrow in Figure 1) is depressed (squeezed) and held in that position. An emitter in the underside of the car's chassis (yellow arrow in Figure 2) sends a "lane change code" to a sensor in the lane change track section (yellow arrows below), and a flipper is activated, diverting the car to the opposite lane. IMPORTANT:  the controller's lane change button must be depressed prior to the car reaching the track sensor. How far before the sensor is encountered will be learned through practice. Once the car has left the current lane, the button may be released.


      Coding, or binding, a D143 controller to a specific car is a quick and simple process. From the instruction sheet excerpted below…

      1. Place the car (and only one car) to be coded on the track in either lane. Click the lane change button of the desired controller twice firmly.
      2. Lift the front of the car up and out of the slot momentarily, then place it back down.
      3. Click the lane change button of the controller again, twice firmly.
      If the car is coded successfully, a short low volume beep will be heard. Pressing the throttle will now move the car forward.


      Performance

      I found the track layout and length to be more than adequate for casual slot racing fun and enjoyment. And the digital aspects of operation were basically flawless. Throttle response was smooth and predictable — at least as good as the GO!!! controllers. Lane changing was smooth, reliable and easy to activate — even with one hand. The smoothness is no doubt a benefit of the fact that the Carrera D143 lane change track section is equal to 1 1/2 times the length of a standard straight section. Something unique to Carrera as a manufacturer. The extra length of the lane change track allows a more gradual transition from one lane to the other.

      The loop is fun but can be a challenge, especially for youngsters who may be using the controller with the speed limiting spacer installed. The cars need sufficient speed when entering the loop to produce enough centrifugal force to traverse the loop. After which speed must be quickly reduced in order to negotiate the subsequent turn. If the car enters the loop too slowly, it will drop upside-down to the track below like a stone! A bit tricky.

      If the loop proves to be too much for some users, it can be eliminated by removing a 114 mm straight section from each of the the front and back straights (two 114 mm sections). Then one of those 114 mm straight sections can be added between the turn #1 exit and the entry to the intersection track section. This will allow the former loop entry and exit points of the back straight to align and be connected directly. This way, no additional track is required. Regardless, my guess is that if the kids really like the loop, they will eventually figure out how to get through it.


      Summary

      Normally three cars are required to experience the full realism, excitement and capability of digital slot racing. Three cars will produce far more situations where lane changing and passing are essential for the competition than two cars. Having said that, the metaphor of a police chase does add a dimension to the digital environment that allows just two cars to exploit the digital capability more than simple two car racing can. One example is to establish a game where the goal is to overtake the Ferrari with the police car and then maneuver in front of the Ferrari in the same lane, forcing it to stop. The Ferrari driver must constantly be thinking ahead, changing lanes tactically to keep from being boxed in by the police car. When running the cars with two participants we found that this type of activity was able to hold our collective interest for numerous laps while providing more than enough excitement and a few hilarious moments!

      The D143 system allows a maximum of three cars on the track simultaneously. So when the time is right, adding a third Carrera D143 slot car and D143 digital controller will add exponentially to the fun and excitement and is a relatively inexpensive proposition. When the racing starts to get a little more serious, the Carrera D143 Lap Counter is also an available enhancement.

      In conclusion, I believe that the Carrera D143 High Speed Chase set is a smart entry into the world of digital slot car racing. The aspect of changing lanes presents a slightly steeper learning curve for younger and less experienced enthusiasts, but today's youngsters will hone that skill quickly. And having to deal with only two cars may make that learning experience a little less frustrating — at least in the beginning.  As to the questions of whether digital technology is effective in the 1/43rd scale and does the High Speed Chase set provide a satisfying digital experience, my answer to both questions is yes, without reservation.

      In any event, feel free to drive recklessly, break traffic laws and thumb your nose at the local police just for the fun of it. But ONLY when you're driving on the Carrera D143 High Speed Chase slot car track!


      Thanks to BRS Hobbies who made this review possible by providing the Carrera D143 High Speed Chase Race Set featured in this article.

      _Michael Ashton